The release of Isolator++ v5 brings exciting improvements for C++ unit testing. However, many developers are still using Isolator++ v4 in their projects and need a smooth transition. In this post, we will cover how to install, run, and migrate from v4 to v5 while using them side by side. For more details, check out our blog post: Introducing Isolator++ v5.
1. Installing Isolator++ v4 and v5 Together
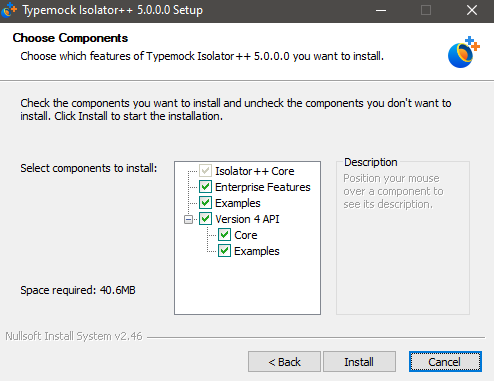
To install Isolator++ v5 and retain access to v4, follow these steps:
- Download and install Isolator++ v5: Follow the Installation Guide.
- Select “Version 4 API” Component during installation: This ensures both versions are available on your system.
- Complete installation: Isolator++ v4 and v5 will now coexist, allowing you to transition smoothly.
2. Running v4 and v5 Side by Side
With both versions installed, you can use v4 for legacy tests and v5 for new/refactored tests.
Note: Each test file can be either V4 or V5 but a single file cannot use both of the API
Example of v4 API usage:
|
1 2 3 4 5 6 7 8 9 10 11 12 13 14 15 16 17 18 19 20 21 |
#include <Isolator.h> using namespace std; class FlightSimulaterTest : public ::testing::Test { virtual void TearDown() { ISOLATOR_CLEANUP(); } } TEST_F(FlightSimulaterTest, TestPlaneSpeed) { FlightSimulater* fake = FAKE<FlightSimulater>(); // v4 API call WHEN_CALLED(fake->GetPlane(EQ("IPP_V5")).GetSpeed()) .Return(1000); ASSERT_EQ(fake->GetPlane("IPP_V5").GetSpeed(), 1000); } |
Example of v5 API usage:
|
1 2 3 4 5 6 7 8 9 10 11 12 13 14 |
#include <Isolator5.h> using namespace std; TEST(FlightSimulaterTest, TestPlaneSpeedV5) { Isolator a; auto fake = a.Fake.Instance<FlightSimulater>(); // v5 API call a.CallTo(fake->GetPlane(A::Eq("IPP_V5")->GetSpeed())) .WillReturn(1000); ASSERT_EQ(fake->GetPlane("IPP_V5")->GetSpeed(), 1000); } |
For a step-by-step guide, see Running v4 and v5 Together.
3. Converting from v4 API to v5 API
To convert, see our Conversion Guide, which lists the conversions. We also provide Convert.ps, a script that performs a simple search and replace for a quick jump-start.
v4 to v5 Code Conversion:
Example 1:
Before (v4):
|
1 2 3 |
WHEN_CALLED(fake->GetPlane(EQ("IPP_V5")).GetSpeed()) .Return(1000); |
After (v5):
|
1 2 3 |
a.CallTo(fake->GetPlane(A::Eq("IPP_V5")->GetSpeed())) .WillReturn(1000); |
Example 2:
Before (v4):
|
1 2 |
MyClass* fakeMyClass = FAKE<MyClass>(); |
After (v5):
|
1 2 |
auto fakeMyClass = a.Fake.Instance<MyClass>(); |
Example 3:
Before (v4):
|
1 2 3 4 5 6 7 |
static int function() { Person* context = (Person*)GET_EXTRA_DATA(); return 20; } WHEN_CALLED(fakeMyClass->getSum()).DoStaticOrGlobalInstead(function,context); |
After (v5):
|
1 2 3 4 5 |
a.CallTo([&](){ fakeMyClass->getSum() }).WillDoInstead([&]() { return 20; } ); |
For full migration steps, check our Conversion Guide.
Benefits of Using Both Versions Together
- Gradual Transition: Migrate in phases without major disruptions.
- Flexibility: Continue using v4 where needed while adopting v5.
- Improved Usability: Take advantage of v5’s cleaner syntax and better performance.
Conclusion
With Isolator++ v5, writing cleaner and more efficient tests is easier than ever. However, you can still use v4 and v5 together to transition at your own pace.
✅ Install Isolator++ v5 Download here ✅ Read more in our blog