I’ve written before about the process of writing the first unit test. I want to give an example of how you’re actually doing it.
What do I want to test
Let’s start with the canonical example: The closing form. Let’s say I have a Windows form. And I want to test what happens when I close it. Here’s the code for the closing event:
|
1 2 3 4 5 6 7 8 9 10 11 12 13 14 15 |
<span class="kwrd">private</span> <span class="kwrd">void</span> IsolatorTestForm_FormClosing(<span class="kwrd">object</span> sender, FormClosingEventArgs e) { <span class="kwrd">if</span> (IsDirty) { var result = MessageBox.Show(<span class="str">"Do you really want to close the window?"</span>, <span class="str">"Confirm Closing"</span>, MessageBoxButtons.OKCancel); e.Cancel = (result == DialogResult.Cancel); } } <span class="kwrd">public</span> <span class="kwrd">bool</span> IsDirty { get { <span class="kwrd">throw</span> <span class="kwrd">new</span> NotImplementedException(); } } |
So let’s start. The scenario I want to test is what happens when I close the form, after data has changed in the form and the user decided not to close the form. If you look closely, you can identify two more scenario to test – can you identify them?
Ok, first step: naming. Here’s the test name:
|
1 2 3 4 5 6 7 8 9 |
[TestMethod] <span class="kwrd">public</span> <span class="kwrd">void</span> WhenClosing_DataHasChangedAndUserChoseToCancel_DontCloseForm() { <span class="rem">// Arrange</span> <span class="rem">// Act</span> <span class="rem">// Assert</span> } |
Arrange Act Assert in action
The name consists of three parts: What I’m testing, the specific scenario, and the expected result, all separated by underscores. Next I’m going to fill in the rest of my test, inside the Act and Assert parts.
|
1 2 3 4 5 6 7 8 9 10 11 12 13 |
[TestMethod] <span class="kwrd">public</span> <span class="kwrd">void</span> WhenClosing_DataHasChangedAndUserChoseToCancel_DontCloseForm() { <span class="rem">// Arrange</span> var form = <span class="kwrd">new</span> IsolatorTestForm(); <span class="rem">// Act</span> form.Show(); form.Close(); <span class="rem">// Assert</span> Assert.IsTrue(form.Visible); } |
Technically, creating the form object is part of the Act, but to be consistent with the next steps, I’ll leave it in the Arrange part, knowing the real story.
Ok, we have a test. Let’s run it. What happens?

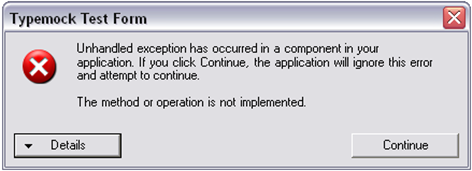
And comes the exception
We get an exception, thrown from IsDirty. To circumvent that, we’ll add a statement to our Arrange that deals with this. In our scenario, IsDirty should be True, since it reflects that the data has changed. The test now looks like this:
|
1 2 3 4 5 6 7 8 9 10 11 12 13 14 |
[TestMethod] <span class="kwrd">public</span> <span class="kwrd">void</span> WhenClosing_DataHasChangedAndUserChoseToCancel_DontCloseForm() { <span class="rem">// Arrange</span> var form = <span class="kwrd">new</span> IsolatorTestForm(); Isolate.WhenCalled(() => form.IsDirty).WillReturn(<span class="kwrd">true</span>); <span class="rem">// Act</span> form.Show(); form.Close(); <span class="rem">// Assert</span> Assert.IsTrue(form.Visible); } |
Let’s run the test again. This time, the test hangs. Well, not really. There’s a message box somewhere waiting for someone to press the buttons. This comes from the event handler as well.

Obviously we don’t want message boxes popping up in our automated tests. In our scenario, the user decided to press Cancel, so we’re going to add a statement for that. The test now looks like this:
|
1 2 3 4 5 6 7 8 9 10 11 12 13 14 15 |
[TestMethod] <span class="kwrd">public</span> <span class="kwrd">void</span> WhenClosing_DataHasChangedAndUserChoseToCancel_DontCloseForm() { <span class="rem">// Arrange</span> var form = <span class="kwrd">new</span> IsolatorTestForm(); Isolate.WhenCalled(() => form.IsDirty).WillReturn(<span class="kwrd">true</span>); Isolate.WhenCalled(()=> MessageBox.Show(<span class="kwrd">null</span>,<span class="kwrd">null</span>,MessageBoxButtons.OK)).WillReturn(DialogResult.Cancel); <span class="rem">// Act</span> form.Show(); form.Close(); <span class="rem">// Assert</span> Assert.IsTrue(form.Visible); } |
Note that I picked the correlating overload of MessageBox.Show inside the event handler, and I gave the compiler enough to approve my code. Since I don’t care about the arguments when I change behavior, I can pass whatever I want, as long as the compiler is happy.
Let’s run the test again. Is third time the charm? YES!! The test passes! Play Ode To Joy!
This iterative scenario works. We start with what we want to test, and the bare-bones test, including the assertion. With every iteration, we bypass another problem, and we go back to the scenario we want to test. We end up with a working test. It’s also a good way to learn Isolator’s APIs.
Try it. I’d like to hear about your experience.


